Showing posts with label back to school. Show all posts

Saturday, September 26, 2015

Under the Sea Classroom

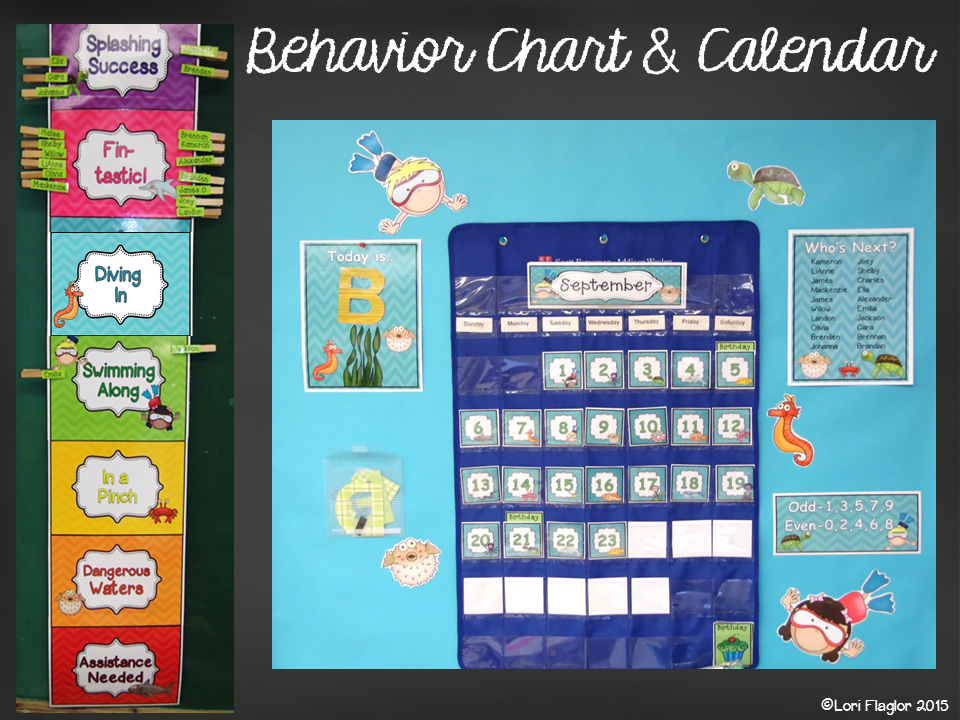
Welcome everyone! This is Lori Flaglor giving you a sneak peek inside my Under the Sea Classroom theme. I totally redecorated my classroom to correlate with our school reading theme of "Dive Into Reading."
 If you like the Back to School Poster I am holding and the Inspirational Quotes you can find the FREE links at the bottom of this blog post.
  I've never decorated my classroom with a theme before, but this year I totally got swept away with the idea. 

  I first began with my large bulletin board in the back of the room. I used different colored scrapbook paper for the letters and cut them out using the Ellison machine. I used streamers and twisted them to look like seaweed. I then used these awesome genre posters from Kelly Knighton. I love the posters because they are so colorful and have cute graphics.   Click here to check out Kelly's store for these genre posters.

  I made this Fin-tastic board to hang student's work. I used clothespins and attached sea creatures to clip the papers onto the board. You can't see it, but I hung matching scrapbook paper under the student papers. I love how easy it is to change the papers and I can leave the board up all year long.
 Next, I decorated my door and it says, "Splashing into Second Grade." Shhh, don't tell the fire inspector my door is decorated!

 My class made these super cute posters and hung them outside our classroom to display for Open House.

 I carried the Under the Sea theme and made a behavior chart and new calendar pieces. I love the bright colors in my behavior chart.

 Here's a closeup of my Alphabet Chart. I have it hung above my board. Here are my desk tags and special schedule cards. 
I am just thrilled with my new classroom! I'm sure the reading department will have a new theme next year, but I'm sticking with this one for awhile. 

Hope you have a Splashing Year in Second!


Click here for the FREE Printable First Day of School Sign.

Click here for FREE Inspirational Posters.


Monday, August 24, 2015

All About Me Writing

Happy Monday, friends! It's Lisa from over at Second Grade Stories with a writing idea for getting to know your students these first few weeks of school. Although we might do a little bit of writing the first few days of school, I like to save any writing I'm going use as a sample for after my kiddos have gotten adjusted a bit.  The first real writing piece we do is an "All About Me" expository text.  I have found that my kiddos come into second grade with a pretty good grasp of the basic format of writing an informational piece (thanks, grade one teachers!) - topic sentence, 3 details and a closing sentence. My main goal for this little project is to just review what they have learned in first grade, see a little of their writing and most importantly - get to know my kiddos!

I did this activity last year and I really learned quite a bit about my new friends. (You can read my original post over on my blog {HERE.} We started with a read-aloud (of course!) that set the stage for "we are all special." Last year I read, I Like Myself. This year I might try one of my new beginning of the year books! (You can click {HERE} to see some new titles I found.) Then we brainstormed a little about ourselves and recorded our ideas on a simple brainstorm sheet.

http://www.amazon.com/I-Like-Myself-Karen-Beaumont/dp/0152020136/ref=sr_1_1?ie=UTF8&qid=1440268495&sr=8-1&keywords=i+like+myself       https://drive.google.com/file/d/0B2ize_mAbVGMSXBkcXdfUjJQYUk/view?usp=sharing

Next, we chose 3 ideas and used them to create an "All About _______" flip book. Here are some samples from last year's kiddos.


I put all the sheets into a little freebie you can download by clicking on the image below.
https://drive.google.com/file/d/0B2ize_mAbVGMSXBkcXdfUjJQYUk/view?usp=sharing

Last year we stopped there, but this year I might do things a little differently. Still using a simple brainstorming sheet, I might take things one step further and use an informational writing graphic organizer to plan our writing. Then I can decide, depending on my group of kiddos (kids don't start until this Wednesday for us!), if I want to try having them take their writing from the organizer to a more formal writing piece.

https://www.teacherspayteachers.com/Product/Back-to-School-Writing-Freebie-2024830
These sheets are from my August/September "Writing Workout" resource. There are brainstorming sheets, graphic organizers and themed writing paper for an "all about me" themed writing piece. This way, I can really tie into the format of an expository piece, while choosing a topic that everyone can be invested in. What second grader doesn't want to write about him or herself?! (You can download these pages by clicking on the image above.)

Building community is so important at the beginning of the year, and getting to know each other better helps develop those bonds. By waiting until my students have settled in before tackling our first writing piece, I feel I get a better sense of what everyone can really do. How about you? Do you wait to start your writing samples, or do you use something from the first day? What topics do you write about?

Saturday, August 15, 2015

Bucket Filling with Lauren Lynes

Hey there! Lauren Lynes here from Simply Second Grade! I am here today to do some "show and tell" about bucket filling! If you haven't done this in your classroom, you must! My team teaching partner and I spend a great deal of time on bucket filling and building our classroom community. If we only teach our students one thing, it is that we want them to be kind, caring, and empathetic towards others. And I can truly say that every year, our students really take care of each other, and that we become a family.

To kick off bucket filling, you will want one of these books; or if you are like me, you will have both :)


After we read and discuss the book of choice, we like to demonstrate how hurtful words or actions can't be taken back, no matter how many times we say sorry. We do this using a tube of toothpaste! As students give examples of "bucket dippers," we squeeze some toothpaste onto a plate. After the toothpaste is all squeezed out, we call students up and have them try to put the toothpaste back in the tube using a toothpick. It is really hard to do, and we can never get all the toothpaste back in... just like we can't take back hurtful words or actions. 


Next, we make two anchor charts--bucket dippers and bucket fillers. Our class always decides that we should throw away the bucket dipper chart and only display our bucket filler chart!


We also have our students do this bucket filling/bucket dipping sort


And to make sure our students are "bucket fillers" all year long, we have a little station where students can fill each other's buckets. All you need are some library pockets! These will serve as your students' "buckets." Then throughout the week, they can write kind notes to each other to fill each other's buckets!! 


You can find bucket filling slips and other bucket filling activities here :) If you've never done bucket filling in your classroom, you should try it out! You won't regret it! I hope everyone has a FABULOUS year!

Friday, August 14, 2015

Back-to-School Welcome Letter and Postcard


Hi all!  It's that time again.  Are you ready to meet your new kiddos?  I know I was always so excited to see all the new little faces and get to know them.  And as excited and nervous...yes nervous...as I was, I know they were just as nervous to meet me and their new environment.

That's why, years ago about a week or so before school began, I started sending out welcome postcards to let my little ones know how excited I was to have them in my class.  I let them know that we would be doing lots of fun activities, and I just couldn't wait to meet them and get started.

I also wrote a letter with the same kind of message, that I sometimes sent instead; or if I didn't get the postcards out in time, I often put the letter on their desks at the before-school open house!  Or sometimes I put it on their desks the first day, so they could read and color it as they arrived, to help ease the tension.

Parents loved these too; they were always telling me how much their kids loved the postcard or letter and would carry it around for days.  This still makes my heart sing!  To think how such a little act can mean so much to a child!

Anyway, today I'm sharing with you my newest postcard and letter templates that are editable so you can type in your own message, names and addresses.  I hope they help to make your beginning-of-the-year a little less stressful, with all you have to get done before the big day.

Just click HERE or on one of the images below.

Have a GREAT year!


You can find me at Primary "Teach"spiration.

Saturday, August 8, 2015

All About Me Necklaces

Happy Saturday, friends! It's Lisa from over at Second Grade Stories and I'm excited to share a fun activity with you that is great for getting to know each other at the beginning of the year. We as teachers know that building a strong classroom community is probably one of the - if not THE - most important thing we do all year.  I started a blog talk series over on my own blog about exactly that! (You can click {HERE} to check that out.) And with all those little faces coming into our room in the first few weeks, it's important to get to know each other.

I love to make "All About Me" necklaces sometime during the first couple weeks of school.  The necklace itself is like a glyph - each part tells something about the person who made it.
You can choose any kind of beads that work for you. I have done it in past years with just pony beads, while other years I added different kinds foam beads that I got from Oriental Trading Co. Beads that spell out their name are a definite must! Here's how we create our necklaces. (Confession: I do not start school until the end of August and I don't have any pictures of this from previous years... sooo... we'll have to make do with what I can put together from home!)

Since we usually do this project when we come back from lunch/recess, I greet them wearing my very own necklace.  It is sure to be noticed and it brings all sorts of questions! I explain that this necklace tells all about me and that each part of the necklace is special.  Now that everyone is excited - and I tell them they'll be making their very own necklace - we're ready to start!

Helpful Hint #1: I prep the beads to be ready before we actually start the project. I find the letters for everyone's names and put them in small containers or baggies so each kiddo has their name all ready to start. (I learned the hard way that having 20 or more kids digging through beads trying to find the letters in their names is CHAOS!) We work at tables, so each table has containers of all the beads we will need - and they are within easy reach of everyone to limit spilling!

I like to project the information for each part of the necklace on the SmartBoard. I have all the slides in a PowerPoint and it's easy to go from slide to slide, one at a time, while I walk around the room. Each bead has a special meaning. For example, the red beds might be for how many people in your family (take one red bead for each person). Green beads show if you take the bus to school or get dropped off - one green bead for the bus, two if you get dropped off.  I include ideas about families, likes and dislikes, school activities, etc.

The possibilities are endless and what's great about this activity is that you can customize it to fit your kiddos! Each time my kiddos take a bead, they put it in their bag/container until we have all the beads we need.  Then comes the fun part - putting it together!

Helpful Hint #2: I pre-cut lengths of a variety of string/cord that we'll be using. Students come up and choose a color. Then comes THE MOST IMPORTANT TIP: TAPE one end of the string to the table/desk. Students will slide the beads onto the other end, but they won't go any further than the tape, so no dropping beads all over the floor when their necklaces are half made! (I do guarantee, however, that at least one kiddo will get excited and pull the string to show their friend and the beads will drop...  but it's better than 10 droppers!)

Everyone gets to design their own necklace by putting the beads in any order they want (names, of course, are spelled correctly!) After the necklaces are created and tied around their necks, we spend a few minutes walking around and chatting with each other about our necklaces. That gets us ready for the second part of our activity - learning about each other!

Since each part of the necklace has meaning, we can find out about each other by looking at our necklaces. I have done this a few different ways: (1) I've created a "Find Someone Who" sheet for students to use to walk around the room and fill in each box with the name of their classmate (ex. Find someone who has 2 sisters; Find someone who takes the bus...); (2) I play music and students walk around. When the music stops, they find a partner and we use the PowerPoint slides to find out about each other. (ex. Does your partner prefer art or gym?) The music starts again, and students find a different partner when the music stops for our next question; and finally (3) I have partnered up students and had them fill out a quick 4-5 question sheet based on their partner's necklace. When we come back to the group, each person shares what they learned about their partner.

I like to end the time with some movement and a "Stand up if..." activity. We all come together and  ask students to "Stand up if..." (basing my questions on the information in the necklace.) This gives everyone a chance to be noticed and it's also a quick way for me to learn about my class.

That's it! This activity is definitely a favorite every year for my kiddos and even though it can get a little crazy trying to get everyone's necklaces done (get other people to help!), it is worth it! Have fun making your own necklaces and finding out about your new kiddos. Building that classroom community has just begun!


Friday, July 31, 2015

Fern Smith's FREE Fall Football Color For Fun!

Fern Smith's Classroom Ideas Freebie Friday ~ Color For a Fun Football Fall Freebie at TeacherspayTeachers, TPT.
Hello Friends!  
It's Fern from Fern Smith's Classroom Ideas and I'm back with another freebie for you! I love back to school time, I always associate it with the start of Football Season! For fun, I created a Football Themed Freebie for you as part of my best selling Color for Fun Series.
Fern Smith's Classroom Ideas Freebie Friday ~ Color For a Fun Football Fall Freebie at TeacherspayTeachers, TPT.

Fern Smith's Classroom Ideas Freebie Friday ~ Color For a Fun Football Fall Freebie at TeacherspayTeachers, TPT.

Fern Smith's Classroom Ideas Freebie Friday ~ Color For a Fun Football Fall Freebie at TeacherspayTeachers, TPT. 
If you like it, I would ♥love♥ some feedback. 

In addition, let's have a little **giveaway** fun! I'm giving away FIVE of my Color for Fun resources, your pick. Simple visit my blog and leave a comment with the one you would like and check it off in the Rafflecopter, it's that easy! 
I will post the FIVE winners on my Facebook page Monday Morning!
Click here to follow me on Facebook.
Fern Smith's Classroom Ideas ~ Teacher Tips, Tricks, Resources and Freebies to make teachers' lives easier!
Every Friday I offer a FREEBIE on my blog, click here to see them. I invite you to come by today and every Friday, to download my freebies for your files. 
You can find me at Fern Smith's Classroom Ideas!
http://www.iteachsecond.com/2015/08/BacktoSchoolPermalink.html
 HEAD over to our newest giveaway, the iTeachSecond teacher authors are so excited to sponsor this giveaway. Click here!

Fern Smith's Classroom Ideas ~ Teacher Tips, Tricks, Resources and Freebies to make teachers' lives easier! 
Have a great weekend friends,
I'll see ya' every Friday!
Fern Smith's Classroom Ideas ~ Teacher Tips, Tricks, Resources and Freebies to make teachers' lives easier!
 Follow Fern Smith's Classroom Ideas on TeachersPayTeachers ~ TPT  Follow Fern Smith's Classroom Ideas on InstagramFollow Fern Smith's Classroom Ideas on Pinterest Follow Fern Smith's Classroom Ideas on Bloglovin

Monday, July 27, 2015

Back to School FREEBIE

Hi there!  It's Hannah from The Classroom Key!


For Make it Monday I've got a cute back to school freebie for your students to make.  This color by number is perfect for second graders because they have to solve doubles problems within 10.  I know I like to help them dust off those math facts when they come back after the summer.

back to school FREEBIE


This is a great fill in activity when you don't have all of your routines up and running.  It's also a good opportunity to set an expectation for neatness in 2nd grade work.  How about putting it out for kids to do while you talk to their parents at back to school night?  Lots of possibilities!   Click the picture to grab a copy!

Best of luck in the coming school year!

Hannah

Saturday, July 25, 2015

Lori Flaglor- Let's Create Memories


Hi everybody, it's Lori Flaglor with another Blog post entry. If you missed my last post Let's Get Organized, click here.
I hope everyone is having a wonderful summer! It's that time again to be thinking of getting back to school. Yes, I said it, SCHOOL!
I don't know about you but I love back to school time. The smell of new crayons, back to school shopping, and a new batch of children to teach.

     This year I'm super psyched to be starting something new with my students it is a Yearlong Memory Book.  I'm sure all of you at the end of the school year do a traditional memory book, but this is different. This starts on the first day of school and the children will add to it throughout the year. It has printable pages for holidays, special events, and special area classes.

Let's take a look:

  Just start with a cover sheet and a large envelope per child.

Print out the sheets you want to use. There are beginning of the year and end of the year printables so you can you can see the growth in the children.

 Students can just place their finished papers back into their envelopes. It's just that easy! Parents will love to receive a whole envelope filled with special memories from their child at the end of the year.

Ready to get started? 
Check out this free sample and start making memories!


I hope you have a great year! 
Happy teaching!


*Thank you so much  Little Piece of Africa for my adorable new logo!