Showing posts with label Freebies. Show all posts

Wednesday, September 30, 2015

What Your Teacher's Guide Won't Tell You About Comprehension

What your teacher's guide won't tell you about comprehension, one simple way to organize the strategies and termsHi there!  It's Hannah from The Classroom Key.   Do you ever feel like your kids are drowning in all the reading strategies and terms you have taught them?  When you ask for the main idea of a text, do they just give you a one word answer?  Or do they launch into a full summary?


One of the first reading strategies I teach is finding the main idea.  Then later we also talk about summarizing... and along with summarizing comes identifying story elements... and some assessments ask students to identify the topic of a text... and on, and on!  Geeze, my head is spinning already!

What your reading series teacher's guide (if you even have one!) won't tell you, is that kids need a way to organize those strategies and terms in their heads!  It may be that your students are good comprehenders but they're getting lost in the terminology.  This can be especially problematic on assessments when you can't prompt them for less or more information. 

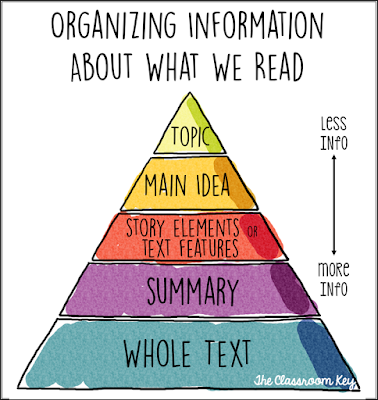
Enter: a solution!  This chart shows how some of the most common reading comprehension terms and strategies relate to one another.  

Reading Comprehension Pyramid, help students see how common reading terms and strategies relate to one another

Notice the bottom of the pyramid is the whole text.  This is the maximum amount of information.  Next is a summary which offers a little less information.  Up higher is the major story elements (characters, setting, problem, and solution) or content from text features (for nonfiction) which is less information still.  Then comes the main idea which is probably just a sentence or two.  Finally at the very top is the topic which would only be one or two words.  

If you ask your students to identify the main idea and they start launching into a summary, draw their attention to this chart to define the difference.  Conversely, if you ask for the main idea of a text and a student says "owls," you can point out how a one word answer would be the topic, but a main idea statement gives a little bit more information.  

Click the picture to download the chart and also a black and white version you can copy for students! 

Thanks for stopping by!


Hannah


Clip art in this post comes from the talented Sarah Pecorino.


Saturday, September 26, 2015

Under the Sea Classroom

Welcome everyone! This is Lori Flaglor giving you a sneak peek inside my Under the Sea Classroom theme. I totally redecorated my classroom to correlate with our school reading theme of "Dive Into Reading."
 If you like the Back to School Poster I am holding and the Inspirational Quotes you can find the FREE links at the bottom of this blog post.
  I've never decorated my classroom with a theme before, but this year I totally got swept away with the idea. 

  I first began with my large bulletin board in the back of the room. I used different colored scrapbook paper for the letters and cut them out using the Ellison machine. I used streamers and twisted them to look like seaweed. I then used these awesome genre posters from Kelly Knighton. I love the posters because they are so colorful and have cute graphics.   Click here to check out Kelly's store for these genre posters.

  I made this Fin-tastic board to hang student's work. I used clothespins and attached sea creatures to clip the papers onto the board. You can't see it, but I hung matching scrapbook paper under the student papers. I love how easy it is to change the papers and I can leave the board up all year long.
 Next, I decorated my door and it says, "Splashing into Second Grade." Shhh, don't tell the fire inspector my door is decorated!

 My class made these super cute posters and hung them outside our classroom to display for Open House.

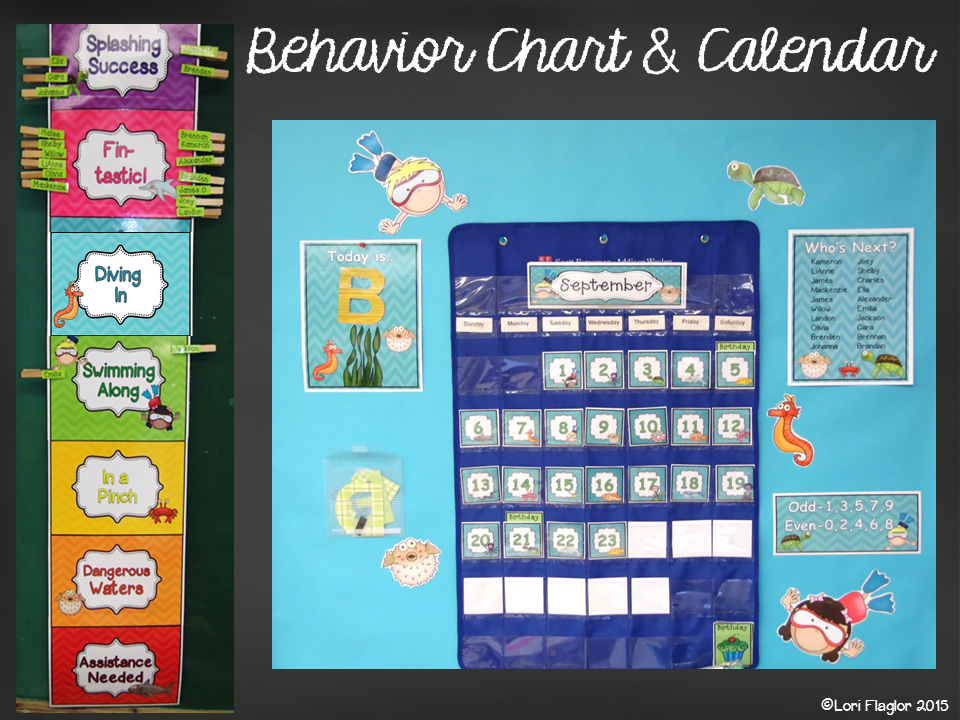
 I carried the Under the Sea theme and made a behavior chart and new calendar pieces. I love the bright colors in my behavior chart.

 Here's a closeup of my Alphabet Chart. I have it hung above my board. Here are my desk tags and special schedule cards. 
I am just thrilled with my new classroom! I'm sure the reading department will have a new theme next year, but I'm sticking with this one for awhile. 

Hope you have a Splashing Year in Second!


Click here for the FREE Printable First Day of School Sign.

Click here for FREE Inspirational Posters.


Thursday, September 17, 2015

Tips and Tricks for Organizing Math

Hi! It's Jen from Teaching in the Tongass.  I hope you are starting your year off on a good foot and things are going as smoothly as they could at this time of year (a tricky task, I know!).  I wrote this post in an attempt to help you organize at least one part of your day.
So let's just dive right in!
One element of Math Workshop that I absolutely love and that I still use every day (and am a huge advocate of), is Roll and Write.  Now, this may be a lengthy explanation, but stick with it.  Here's how it works: Materials: Some teachers use lined paper (notebooks) for students to do their Roll and Write, but I have come to prefer these packets that I made.  I actually like students to write in a lined notebook (is that crazy?), but for some reason, this fits my brain better lately....The Roll and Write packet is stored in their Math Binder (1 inch).  They open it to a new page, write the date, and wait for me to start the timer for 5 minutes.
Personally, I love the yellow foam dice. You can check them out by clicking below:
You can snag the FREEBIE I made by clicking below.
The timer I use is PERFECT because a.) it is big enough to see from the back of the room, b.) it has a light to make it stand out, c.) it gives a 1 minute warning, d.) it visually counts down by the second, and e.) you can choose to have the audio (this one is a "beeper") or not. I bought it from Kagan.
Students have a set of either dot (the easiest because they can count the dots) or digit (a little more advanced) FOAM dice, or for students working at a harder level, I have colored wood dice with 5-10 numbers or octa-dice with larger numbers.  If a student isn't using the foam dice, they get a small square of felt to roll on (so that it is silent).  You can also use a deck of cards for "Flip and Write" if you don't have dice or would just rather use cards (just separate 1-5 or 5-10 if you want them to be working within a certain range).  Each student keeps their dice in their zipper pouch (in their binder).  I have a tub that I store dice in so I can switch out quickly if need be.
Directions: At the beginning of every year, I give explicit instructions on what Roll and Write should look/sound like. Students need to hold the dice in their hands, put their wrist down on their desk and open their palms.  I've discovered there is no reason to roll or shake the dice (sometimes kids like to shake dice for 30 seconds...time wasting). After the dice are rolled, they ARE NOT ALLOWED TO TOUCH THEM. For some reason, I've noticed lots of kids (girls in particular), that like to adjust their dice and make them side by side or perfectly aligned so the number isn't upside down.  Doing this each and every time adds up.  I demonstrate why we don't roll dice, drop them from above, or waste time making them 'look pretty' (I make a show of it, dropping dice all over, acting silly...acting is such a big part of our job, isn't it?).
After students have mastered how to quickly roll their dice, I start the timer and students get to work.  They roll and write, roll and write, roll and write.  While they are working, I roam the room with a RED pen (I know, I know, I'm a terrible person).  It could be a different color, as long as it isn't the same as what they are using.  If I spot ANY mistakes (number reversals, digit reversals, incorrect answers, sloppy writing, etc.), I underline the mistake with my red pen and WALK AWAY.  That part is really important.  Students need to be able to identify their own mistakes, and I've learned that if I stay there right next to them, they tend to argue or get in a discussion of "what I meant to write was a ...." instead of just fixing the problem.  As soon as I underline, students need to fix their mistakes.  This is really important as I don't have time to look over each roll and write every day, and I don't want them practicing something incorrectly.
After the 5 minutes is up, the timer goes off and students get to finish the equation (and yes, that is the word we use) they are working on. Then, they count up all of the equations they were able to complete and write their total at the bottom of their page.  Because I've assessed where they should be at (which dice, which type of equations), they should be working at their "just right level" (not just for books!).  This means, they should be getting at least 15 problems done in the 5 minutes.  If  a student wasn't able to complete 15, I keep them in at recess and have them do it again for 5 minutes (I do this so that I can watch to see if it's something like they are wasting time adjusting or something else...usually it's just that they were off-task though).  At this point, I've discovered students will sometimes cheat and start writing on a previous day's page to make it appear they have completed 30 that day. So, to combat that, I've added a "you must get the teacher's signature at the top of the page the same day you get 30/30" rule.  That way, if they try to show me a 30/30 that isn't signed from a previous date, I know they were combining two days of work. Motivation plays a big factor in a successful day of Roll and Write.  I sometimes use Matthew Cando (get it? Math you can do!) as a motivator.  I got him at a district training a few years ago and the kids LOVE him.  He has a cute robot voice (my husband taught me well) and likes to sit on the desk of someone who had a CAN-DO attitude during Roll & Write.
We also have a discussion about "not announcing your score" and how they are competing against themselves rather than eachother.  I want them to beat their best score and not worry about anyone else's.  For the most part, this isn't a problem after the first day.  On some occasions though, I have used competition to get a couple of boys who were unfocused to get the job done.  Worked like a charm for them (sometimes people just need a lil competition!).
When a student completes 3 days (does not have to be consecutive) of 30/30, I move them on to the next thing on my Roll and Write checklist and write the date they started the new skill.  I keep this list in a page protector on the whiteboard so that I have quick access to it.
And because I'm not always there to remind a student how to do the skill they are working on, I include this how-to page in their packet (it's also helpful for a guest teacher or a paraeducator working in your room, or a parent when you send a packet home).
Another element of balanced math is spiraled review. I use Drops in the Bucket.  After students finish Roll & Write, they get out their Drops in the Bucket packets.  Again, kept in their Math Binder. Click below to check out their website and download sample pages. Note: I'm not being paid to advertise for them, I just like it that much!
The idea behind these worksheets is that they are REVIEW (not new learning) and students should be working INDEPENDENTLY.  That means, if a student doesn't know how to do a problem, I do not use the packet to teach them.  That doesn't mean I don't help them with a minor issue they are stuck on, but if they are totally lost on a problem, I don't sit down right then and there to show them how to do it: they skip it.  I will teach the concept later during a math minilesson or during Calendar time (this is a great way for me to see what things I need to add to my minilessons).  Basically, this means I don't stand in front of my projector going through each problem with the whole class and using it to teach new skills/concepts.  Each student works at their own pace, and at their own level.  I use levels A, B, and C for just 2nd grade.  I set the timer for another 5 minutes.  While students work, I roam around with that red pen I was just using during Roll and Write. I underline or circle mistakes and walk away so they have to figure out what they did wrong right away.  If a student reaches the bottom of the page before the 5 minute timer goes off, they TURN THE PAGE and keep working.  When they finish their whole packet, they turn it in so I can have a thorough look at it.  I correct any other mistakes I wasn't able to catch during my roaming, and write which page numbers they need to fix on the front of the packet.  They might turn that packet in 2 more times before all of their corrections are done, but it doesn't ever go home with uncorrected mistakes in it! I personally like Drops in the Bucket because it has such an extensive selection of types of problems and I love that the different levels are really differentiated while the format stays the same.  You could do this daily math review with Evan Moor or Minute Math as well though.
I store all of my Drops in the Bucket masters in binders for easier packet-copying.  Each packet has the level and range so I can quickly see what a student is working on. A couple of things that go in the binder and are used all year long... Number words poster (these are a FREEBIE and HANDY!):
And Coin War (also a FREEBIE...this is the default game for my Sub lessons and whenever there is a need to keep them busy for a moment while I deal with an issue):
I keep this anchor chart up all year for a reminder:
Hopefully, this post was very clear on how I manage my daily math fluency and what we store in our Math Binders. If you have any questions, or do something similar, I'd love to hear about it! Comment below! Head to the next post in this series by clicking below:

Friday, August 14, 2015

Back-to-School Welcome Letter and Postcard


Hi all!  It's that time again.  Are you ready to meet your new kiddos?  I know I was always so excited to see all the new little faces and get to know them.  And as excited and nervous...yes nervous...as I was, I know they were just as nervous to meet me and their new environment.

That's why, years ago about a week or so before school began, I started sending out welcome postcards to let my little ones know how excited I was to have them in my class.  I let them know that we would be doing lots of fun activities, and I just couldn't wait to meet them and get started.

I also wrote a letter with the same kind of message, that I sometimes sent instead; or if I didn't get the postcards out in time, I often put the letter on their desks at the before-school open house!  Or sometimes I put it on their desks the first day, so they could read and color it as they arrived, to help ease the tension.

Parents loved these too; they were always telling me how much their kids loved the postcard or letter and would carry it around for days.  This still makes my heart sing!  To think how such a little act can mean so much to a child!

Anyway, today I'm sharing with you my newest postcard and letter templates that are editable so you can type in your own message, names and addresses.  I hope they help to make your beginning-of-the-year a little less stressful, with all you have to get done before the big day.

Just click HERE or on one of the images below.

Have a GREAT year!


You can find me at Primary "Teach"spiration.

Thursday, August 6, 2015

Meet the Teacher Night Tips - Brinca into Bilingual

Hello everyone! It is sooo good to be back on this great collaborative page! I'm Mrs. Nicolau from Brinca into Bilingual!
Today I want to share with you some of the things I get ready around this time for Meet The Teacher Night! YESSSS... I know!!! I am (and you are too) already thinking about that!

So I'm gonna share with y'all my freebies and some ideas for you to use on that night!

What I usually have on me: TWO sign-in sheets for my personal use and for me to turn in to my school (the last school I worked at, they used to give me a copy they made themselves and I used to make me an extra copy to use as well),  a post-it, and my information card.

So I would leave the school sign-in sheet on a table by the door for my parents to sign-in. As they come to talk to me, I would write down their information such as phone number, their child's name, and most important, the transportation for the school year. This info would easily change since some of my parents would take and pick them up for the first week or anything like that. It helped me big time to have an extra copy with their number on it in case I needed to contact them on the first day of school. On that sheet (full of scribbles, I would also write any information or concerns parents tell me on that night).

I also had post-its, so while I was talking to parents, I would ask my student to write their name on it and choose a place. Yes, I of course would change their place if it was necessary, but at least it gave them a chance to choose where to sit for the first weeks. And believe me, there were students that never moved from there because they worked so well that it wasn't necessary to move them.

Last, but definitely not least, I would give them my info card. I would point out the magnet on the back so they wouldn't lose it and place it on their fridge if they wanted to. They all come in English and Spanish. You can edit the text to put your information. Please know that I can't give you access to the font or clip art due to copyright...
I have several styles, so just click on the picture to check the one you like the most :)


Click HERE to take you to this Teacher Contact Info Card.

Click HERE to take you to this Teacher Contact Info Card.


Click HERE to take you to this Superhero Teacher Contact Info Card. This document comes for both female and male teacher.


Now, I would have some thing on their desks as well. On there, there were the following:
1. Any school papers.

2. Handout with my information. I know several bloggers have created the booklet foldable, I know it's SOOO adorable and I just loveee the colors they used. However, I'm honest with y'all, I came up with a simpler way and a simpler foldable that I personally think it will do the work :) Now, it doesn't have as many windows as the other foldable, but this is what I used and it has worked just find for me

This foldable contains the basic information I provided to my parents. Say goodbye to the millions lose pages!! No more using 10 pages for 10 different things!!! All the info is in this foldable!!!
I created a document on google docs so you can edit the inside only (if you want the pretty font). Please just remember that I can't give you access to the font or clip art due to copyright. What you can edit is the inside of the document with your own information!
This foldable come sin both color and B/W version. It also comes in both English and Spanish (for my bilingual friends out there!)


Click HERE if you would like a copy of this foldable.

3. Along with the papers from school and my foldable I used to place a Goody Gift Bags for each student. I would like to share with you some snacks ideas that you can give to your students.

I have a wild/safari theme, click HERE to download it for FREE.


I have a circus/cotton candy theme, click HERE to download it for FREE.


Lastly, I have a Superhero Theme. It is so simple and inexpensive! The yellow cereal is "Kix." I have never heard of this cereal before, but I saw it on a "healthy school list snack" and I tried it; it tastes pretty good! If you do not want to use that one, you can also use Corn Pops. The other colorful cereal was part of the Cap'n Crushs Oops all berries, but you can also use Trix, Froot Loops Loopers.
Click HERE to download it for FREE! :)


I couldn't resist to post this one. As I was taking the pictures, Pollita (my 14-month old daughter) grabbed the bags of the cereal she likes! I thought it was too funny and I thought you might laugh along with me! Look at those chunky fingers!! lol 


Thank you everyone for stopping by our blog today! I hope to see y'all very soon!!

Sunday, August 2, 2015

All Your Math Plans = DONE

If you teach Common Core Math, then I have an amazing surprise for you -- a planning pack for 1st quarter that includes basically everything you'll need to teach math.  I've done ALL the planning, all you need to do is teach! And did I mention that you can have this for FREE (you're welcome) . . . 
Math Planning Pack for 1st Quarter (2nd Grade - Common Core)

So why is this product soooo amazing?  Let me show you some specifics . . .

Your plans for the first nine weeks of school are completely done!  I have included the Common Core standards, activities that will teach the standards and extra information that is very valuable.  In addition to the daily lesson plans, I've also included a quarterly pacing guide to help you easily view the specific standards taught throughout the entire first quarter.


The daily math sheet is my ALL TIME FAVORITE part of this document. I copy it on cardstock and also laminate it -- one for each student in my class. My kiddos complete this sheet every day as part of their morning routine. This sheet incorporate NUMEROUS skills that are taught throughout the quarter. I have seen so much growth in my students' math abilities and I attribute most of the growth to this activity. In order for your kiddos to truly establish a firm mathematical foundation, it's essential for teachers to have their students practice foundational math concepts on a daily basis. And this sheet does exactly that.


I don't want to ramble on and on about this product, I want you to CLICK HERE to download it for FREE and check it out for yourself.  However, here are some other things included in this product:

Send this letter home to parents at the beginning of the quarter so they know exactly what their child will be learning in math.


Use this checklist as a way to keep track of students' progress. Once they've mastered a skill, sign your name and give them a smiley face. At the end of the quarter, each students' checklist will give you valuable information about their abilities.


Post these cards on your wall so students can see exactly which skills they are learning in math. These cards are phrased with 'I Can' statements to help students easily discuss what they are learning.


And this is only the beginning of the great products I have to help you effectively teach math all year long!  CLICK HERE to download this entire packet for free and don't forget to check out the other amazing math resources I have for sale.

Enjoy!

Leah